
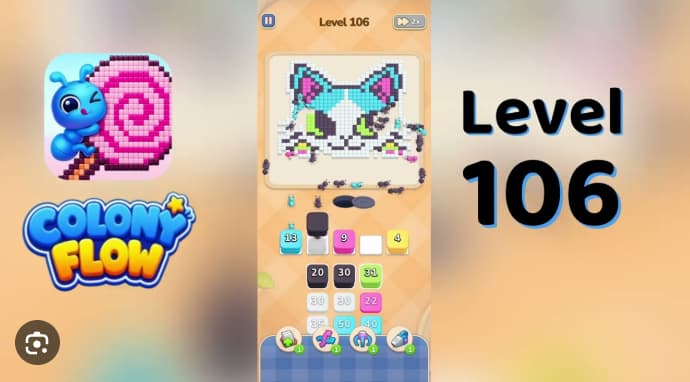














































































































































































Colony Flow Level 106 challenges players with a deceptive late-game trap: the oversized white face refill appears helpful but actually blocks your optimal path to completion.
The key is recognizing when to ignore the refill and commit to your current flow path instead of chasing what looks like a safety net.
What Is Colony Flow Level 106?
Colony Flow Level 106 is a pixel-art cat portrait built around a single ant hole beneath the chin. Five yellow opener stacks must clear the background first because every later color—cyan outline, black mask, pink paw, green pupil, and white face—shares that one route.
The core challenge is traffic order. Yellow 3, yellow 24, the two yellow 26 stacks, and yellow 44 establish the top band, side background, under-chin strip, and paw caps. Only after that yellow rim is mostly in place can cyan, black, pink, green, and white move through safely to finish the portrait’s outline and interior details.
How to Solve Colony Flow Level 106
-
Tap yellow 3 first. Let it claim the lower-left background and the yellow strip above the ant hole before touching any lower-source color.
-
Drain the yellow queue. Send yellow 24, then two yellow 26 stacks, then yellow 44. Leave a short beat between taps so the top band, side background, and paw caps stay ahead of each wave. Do not promote cyan 5, black 20, or white yet.
-
Start cyan and black routing. Once the yellow rim is mostly placed, send cyan 5, then black 20 and the first black 30. These waves begin the forehead stripe, ear rims, eye-mask edges, whiskers, and lower outline.
-
Add pink and green. Tap pink 30, then pink 22 to color the inner ears and paw pads. Hold green 31 until black has framed both eye sockets—early green ants park on the still-white face instead of dropping into the pupils.
-
Finish with white and late cleanup. Start white 30 and white 35 after the black whisker lanes and pink paw routes are clear. Thread cyan 35 and cyan 40 between white waves to finish the ear rim and border cells. Save black 50 and the final yellow accent for the end.
Colors: Yellow, Cyan, Pink, Green, Black, White
Common Mistakes
-
Promoting cyan 5 or black 20 while yellow 26 and yellow 44 are still using the hole. This clogs the route and leaves the top band or under-chin yellow strip unfinished.
-
Sending green 31 before black has opened both eye sockets. Green ants park on the white face and delay the pupil finish.
-
Firing large white refills before black whisker lanes and pink paw routes are stable. White stacks across the muzzle and starves the final cyan and black cleanup.
Quick Tips
-
Clear all five yellow opener stacks before routing cyan 5 or black 20. The yellow background, paw caps, and under-chin strip need the hole first.
-
Hold green 31 until a black wave has framed both eye masks. The two lime pupil cells are tiny, and early green traffic stalls on the still-white face.
-
Treat late white refills as finishers, not openers. White is safest after one black outline wave and both pink paw-pad waves have started, because the muzzle and paw cells are ready to accept the traffic.
What should I tap first?
Start with yellow 3 in the far-left active cell, then drain yellow 24, yellow 26, yellow 26, and yellow 44. Level 106 is built around a five-stack yellow opener, and the lower cyan, black, pink, green, and white refills become safer once that yellow rim is already around the cat portrait.
Related Games
- Colony Flow Level 30 Walkthrough — Continue practicing the careful stack-promotion timing and single-route traffic control needed to keep colors from blocking one another in Level 106.
- Colony Flow Level 31 Walkthrough — This follow-up Colony Flow guide is useful for players who want another color-routing puzzle after mastering Level 106’s yellow-first opening and delayed cleanup waves.
When is the big white face refill safe?
Wait until the yellow background is mostly finished and at least one black outline wave has opened the eye-mask and whisker lanes. Then white 30, white 35, and the later oversized white promotions can clear the nose bridge, cheeks, muzzle, and paws without parking across the entrance path.