
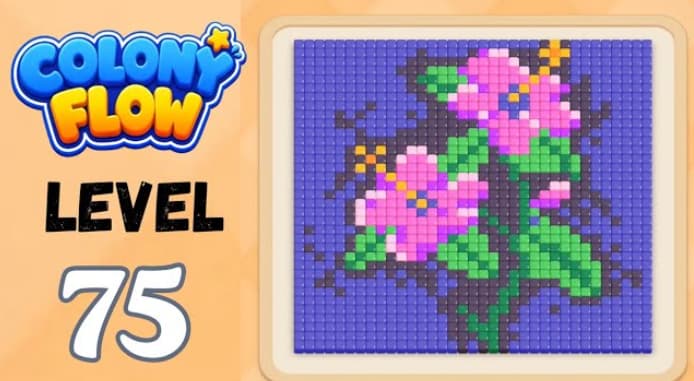














































































































































































Level 75 in Colony Flow is a canopy board that requires strategic resource management and careful pathfinding to complete.
The guide focuses on practical mechanics—which tiles to target first, when to use power-ups, and how to avoid common bottlenecks that stall progress.
Colony Flow Level 75 Walkthrough
Colony Flow Level 75 is a flower-cluster board where purple background, green stems, pink blossoms, and yellow pollen share one central trail. The main challenge is managing the shared route with only five tray slots. Large pink blossom stacks create a dense canopy that blocks green stem lanes and traps small yellow pollen dots if opened too early.
The safest order: open the purple background first to peel back the dark backdrop, release one green stem stack to establish a vertical lane, send another purple wave to thin the background further, then bring in pink blossoms only after the stem route is active. Clear yellow pollen while the center remains open, finish remaining purple, green, and pink stacks, and save black outline accents for last when the canopy has thinned.
Step-by-Step Solution
-
Tap a small purple background stack first. This peels back the dark lower background and makes room for later waves.
-
Release one green stem stack. Opening a vertical stem lane early prevents the pink canopy from sealing it off.
-
Send another purple wave. Further thinning the background keeps the center route from clogging.
-
Bring in the first pink blossom stack only after the stem lane is active. Pink stacks are wider than they appear and can trap green cubes beneath them.
-
Clear the small yellow pollen wave while the center remains open. Waiting until all pink stacks are active leaves the yellow dots stuck behind the bouquet.
-
Finish the remaining purple, green, and pink stacks. Save the black outline accents for last, when the canopy has thinned and the route is cleaner.
If the board stalls, tap the color with the clearest available path instead of adding another crowded stack to the tray.
Common Mistakes
- Opening the pink blossom stacks before green stems are moving traps the stem lanes under the canopy.
- Saving yellow pollen dots until every pink wave is active forces the smallest accents to wait behind the whole bouquet.
Quick Tips
- Background first, blossom second. Purple progress gives stems somewhere to land before the pink canopy arrives.
- Use at least one green stem wave early. The bouquet is safer once one vertical stem route is visible under the flower heads.
- If stuck, look for the color with the cleanest path and use that to regain space.
Related Games
- Colony Flow Level 37 Walkthrough — Continue with another Colony Flow puzzle that reinforces the value of opening clear routes before releasing larger color stacks into a crowded center.
- Colony Flow Level 35 Walkthrough — This nearby walkthrough gives players another opportunity to practice sequencing color waves carefully rather than clearing the biggest visible group first.
What Makes This Level Difficult?
Level 75 is a canopy board. The blossoms look like the focus, but pacing depends on the purple backdrop and green stems that support the bouquet. The picture shows pink flowers with green stems and leaves on a dark purple background. The active row starts with small background and flower stacks, while the lower grid keeps feeding more purple, green, yellow, and pink waves into the same center chute. The board breaks when heavy pink blossom stacks go first—they clear the center canopy and block the stems underneath, which also traps the tiny yellow pollen dots that only fit through the same route.