














































































































































































Colony Flow Level 63 Walkthrough guides you through one of the trickiest puzzle stages in Colony Flow, where precise pipe placement and resource routing become critical.
This level introduces tighter space constraints and more complex colony needs than earlier stages, requiring you to balance water flow, oxygen distribution, and waste management simultaneously. This walkthrough focuses on the optimal pipe layout, which resource nodes to prioritize first, and how to avoid the common bottleneck that traps most players in the lower-left quadrant.
You’ll find step-by-step placement order, the exact timing for activating each flow valve, and troubleshooting for the three most frequent failure points that force restarts.
Colony Flow Level 63 Walkthrough
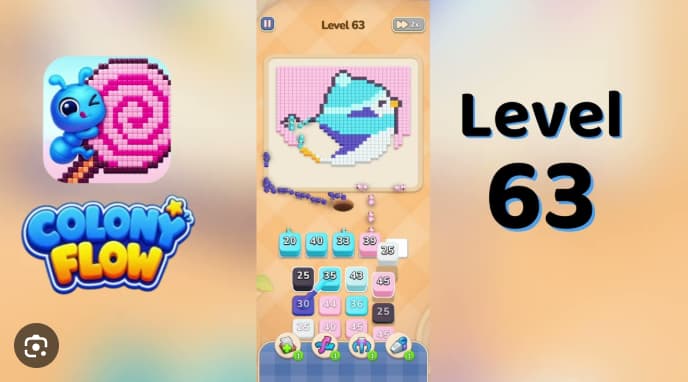
Colony Flow Level 63 is a blue-bird portrait board where pink accents, the cyan head, dark-blue wing, and brown blocks all share one dirt trail. The pink 8 and pink 12 openers must clear the accent band before the dark 24 wing wave is released, or dark-blue ants will stall on remaining pink cells and block late refill waves that need the same route.
The main rule: tap the pink 8, pink 12, and black 9 from the active row before touching source row stacks, then walk each source row left to right while leaving one beat between waves so the trail does not jam.
Level 63 Objectives and Board Layout
The board opens with a five-cell active row holding pink 8, pink 12, black 9, and two empty white buffer pads. Below it is a three-row, four-column source grid:
- Source row 1: cyan 36, pink 45, cyan 43, dark-blue 30
- Source row 2: cyan 40, pink 40, cyan 36, dark 24
- Source row 3: beige 13, pink 30, pink 45, dark 40
Pink cubes clear the accent band around the bird. Black clears the eye. Cyan clears the head and upper body. Dark-blue clears the wing and lower body shading. Late white, yellow, and brown refills clear the belly stripe, beak, feet, and two brown 43 blocks on the lower body. All colors share the same dirt path, so the pink accents and black eye must clear first.
Step-by-Step Solution
1. Clear the active row. Tap pink 8, wait one beat forants to reach the lower accent cells, then tap pink 12. Wait again, then tap black 9. Do not tap any source row stack yet. Leave both white buffer pads empty.
2. Drain source row 1 left to right. Tap cyan 36 as it rises into the fourth active-row cell, then pink 45, cyan 43, and dark-blue 30. Leave one beat between each wave so the pink accents are mostly cleared before the cyan head starts.
3. Clear source row 2, but hold the wing. Tap cyan 40, pink 40, and cyan 36 as they rise. Do not tap dark 24 yet. Wait until the cyan head is at least half-cleared, then release dark 24. Tapping this stack too early strands dark-blue ants on remaining wing cells and blocks the dark 40 and late refills.
4. Finish source row 3 left to right. Tap beige 13, pink 30, pink 45, and dark 40 as each one rises.
5. Handle cleanup refills. Tap late cyan, dark-blue, pink, white, yellow, and brown refills as they rise into open buffer pads. White ants clear the belly stripe, yellow clears the beak and feet, brown clears the two 43 blocks. Leave one beat between each refill so small cleanup ants do not stall behind the remaining wing cells.
Related Games
- Colony Flow Level 43 Walkthrough — Continue with another late-game Colony Flow puzzle walkthrough for similarly precise stack-tapping order and buffer-pad management.
- Colony Flow Level 36 Walkthrough — Its step-by-step Colony Flow solution is a useful follow-up for players practicing color-wave timing before tackling or replaying Level 63.
Common Mistakes to Avoid
Firing the dark 24 too early. If the pink 8, pink 12, and black 9 waves have not cleared most of the accent band, dark-blue ants will stall on remaining pink cells and block the dark 40 and late refills that need the same route.
Tapping cyan 43 while pink ants are still walking the dirt path. This strands cyan ants on remaining head cells and blocks the cyan 40 and late cyan refills.
Filling buffer pads with source clicks instead of refills. The white pads are needed for late white, yellow, and brown waves. Filling a pad with a large cyan or dark-blue stack leaves the belly stripe, beak, and brown43 blocks empty.