
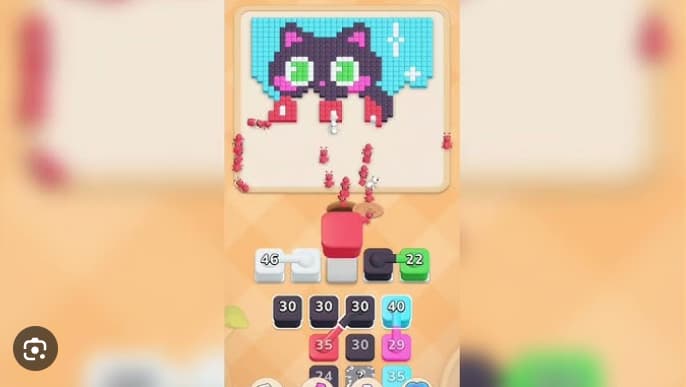














































































































































































Colony Flow Level 25 Walkthrough breaks down the specific pipe-routing puzzle where you connect all colony nodes using continuous flow paths without overlaps or dead ends.
This level introduces tighter grid constraints and more complex node placements than earlier stages, requiring you to plan your full route before committing to early connections. The core challenge is solving the spatial logic while maintaining colony connectivity across the entire board.
You’ll find practical mechanics for testing partial solutions and concrete visual breakdowns of the full solution path, you can either follow the complete walkthrough or use the approach to solve similar flow-based colony puzzles independently.
How to Solve Colony Flow! Level 25 — Full Solution
Colony Flow! Level 25 presents a four-row ladybug board where green 22, black 30, cyan 40, red 34, pink 29, white 50, and a gray ”?” mystery tile share a single ant hole. The board opens with red 1, white 50, and gray 27 pre-placed in a 5-cell top row above a 4×3 source grid. The ladybug image includes a rounded red body, two green eyes, three black spots, pink head and tail highlights, a small white back highlight, and a cyan background with two pale blue sky squares.
The solve requires opening the perimeter first—green eyes, black spots, and cyan background—before committing the large red body wave. Red shares the dirt path with every other color, so releasing it too early blocks later refills and stalls the board.
Full Walkthrough
-
Tap green 22 in the second row, second cell from the left.
Green ants walk up the dirt path and clear the two green eyes on the ladybug head. Wait one beat for the first green ants to reach the eyes before releasing the next stack. -
Tap black 30 in the second row, third cell.
Black clears the three spots on the ladybug back plus the small antenna and dark accents. Green and black share the path, so leave one beat between them to avoid jaming the route. -
Tap cyan 40 in the second row, fourth cell.
Cyan removes the cyan background and the two pale blue sky squares in the upper right. Hold red 34 for one beat so green, black, and cyan can clear the perimeter together. -
Wait for the perimeter to drain.
Do not tap red 34 yet, and do not let pink 29 from the third row rise into the active queue. The green, black, and cyan waves need room to finish before red occupies the path. -
Tap red 34 in the second row, first cell.
Once the route clears, red ants walk the dirt path and fill the rounded red body. Red shares the path with cyan, so leave one beat between the red wave and the next cyan refill that rises from the third row. -
Tap pink 29 in the third row, fourth cell, after red is at least half cleared.
Pink lights up the head and tail highlights. Tapping pink before the red body is half-cleared strands pink ants on remaining body cells and blocks the red refill waiting behind them. -
Tap white 50 from the top row plus the white refill that rises from below.
White clears the small white highlight on the back. White shares the path with every other color, so save it for late game when most of the silhouette is already colored. -
Finish with cyan, black, red refills, and the gray ”?” mystery tile.
The cyan stacks clear the last sky squares, black stacks clear the last dark accent cells and antenna, red refill clears the last body cells, and gray handles the small gray accent cells. The board clears once the last matching cube routes off and the level banner appears.
Level 25 Objectives and Route Strategy
The objective is to clear the ladybug image by routing ant colors to their matching cells without jaming the single shared dirt path.
- Green 22 clears the two eye cells
- Black 30 (three stacks total) clears spots, antenna, and dark accents
- Cyan 40 (four stacks total) removes background and sky squares
- Red 1and red 34 clear the main rounded body
- Pink 29 clears head and tail highlights
- White 50 plus refill clears the small white highlight
- Gray ”?” mystery tile handles remaining gray accent cells
The safest opening is green 22 → black 30 → cyan 40 → wait → red 34 → pink 29. That sequence creates access around the outside before committing the large red body wave. Red is the main traffic risk: releasing it while cyan, green, and black still occupy the dirt path strands red ants on remaining body cells and blocks pink 29 and later refills.
After pink clears the highlights, let the board settle before spending cleanup sources. The remaining cyan, black, and red refills serve active parts of the main image. Use white 50 and the gray ”?” tile only when the route is mostly empty.
Common Mistakes to Avoid
- Firing red 34 before the perimeter clears strands red ants on remaining body cells and blocks the pink 29 refill waiting in the third row.
- Tapping pink 29 before red is half-cleared sends pink ants across remaining body cells and stalls them while the red refill waits behind.
- Burning the gray ”?” mystery tile too early disrupts the planned routing order and leaves small gray accent cells uncleared even after the bottom of the grid looks clear.
Quick Tips for Colony Flow! Level 25
- Tap green 22, black 30, and cyan 40 from the second row in that order so eyes, spots, and background clear together before red enters the dirt path.
- Hold red 34 for one beat after green, black, and cyan start. A premature red click strands red ants and blocks pink 29.
- Save white 50, gray ”?”, and small refills for final cleanup. They are the last highlight and accent colors, and the win condition is an empty board after the ladybug image clears.
- If the board stalls, stop tapping. Let current ants complete deliveries rather than adding another color wave to an occupied path.
Related Games
- Colony Flow Level 27 Walkthrough — Continue with this nearby late-game level for another color-routing puzzle that rewards careful stack timing and path management.
- Colony Flow Level 22 Walkthrough — Revisit Level 22 for a slightly earlier Colony Flow challenge using the same tap-order and shared-path mechanics.
Enjoy!