
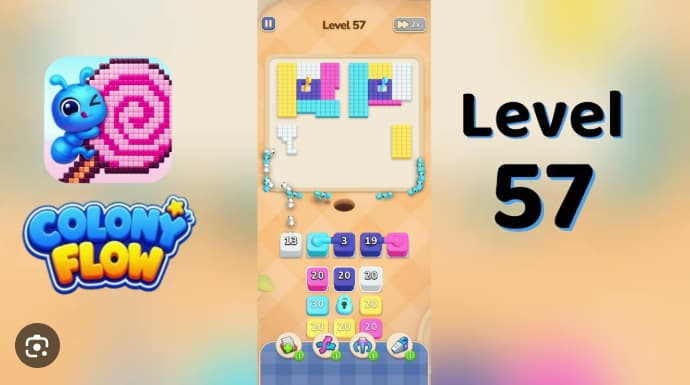














































































































































































Colony Flow Level 57 is a four-island colored-block garden board where the pink mass, white gaps, cyan band, and blue connectors all share one ant hole, and the twin pink 9 openers have to drain before the heavy blue 30 connector wave rises from source row 2.
You’ll find the essential opener timing, connector priority, and drainage order that solve the shared ant hole bottleneck without wasting moves.
Colony Flow Level 57 Walkthrough
Colony Flow Level 57 is a four-island garden board where pink, white, cyan, and blue groups share one ant hole. The winning sequence drains two pink 9 openers and clears the white bridge before releasing the heavy blue 30 connector wave from source row 2.
Use one-beat spacing between waves: let the first ants begin walking and clear dirt before tapping the next stack.
How to Play Colony Flow Level 57
Start with the five-cell active row. Do not tap source-row stacks during the opening.
- Tap the pink 9 in active-row cell 1. Wait until the first ant clears the dirt path.
- Tap the second pink 9 in cell 2, then wait one beat. These waves drain the upper-left pink mass.
- Tap white 11 in cell 3 and wait one beat.
- Tap white 10 in cell 4. White ants clear the gap cells connecting the islands.
- Leave the fifth active-row cell, the white buffer pad, open for later refills.
Once the opening pink and white groups are moving, clear the source rows in order:
- Source row 1: green 14, green 20, pink 20, pink 20.
- Source row 2: blue 20, blue 30, blue 20.
- Source row 3: blue 24, blue 20, yellow 24, yellow 20.
Tap each stack as it rises into the active row, with one beat between waves.
Tips for Completing Colony Flow Level 57
Keep the blue 30 in reserve. The blue 30 in source row 2, column 3 is the largest wave on the board. Release it only after both pink 9 stacks and the white 11/white 10 openers are already clearing. Sending it early stalls blue ants on blocked connector cells and clogs the shared route.
Protect the white buffer pad. Do not fill the fifth active-row cell before source row 3 arrives. Yellow 24 and yellow 20 need this space to rise cleanly, and a blocked buffer prevents the late cyan cleanup from moving.
Handle blue before yellow refills. Clear the blue connector waves while pink and white ants are still draining. This keeps the center route open when the yellow stacks rise.
Space color changes carefully. One-beat timing matters most when switching from pink to white and green to blue. Tapping too quickly stacks ants on the same dirt route before the previous wave clears it.
Related Games
- Colony Flow Level 30 Walkthrough — Continue with another numbered Colony Flow puzzle guide that focuses on timing colored ant waves through a shared board route.
- Colony Flow Level 27 Walkthrough — Follow this walkthrough for another level where ordered taps and careful queue management are key to preventing blocked color paths.
- Colony Flow Level 25 Walkthrough — This is a useful next click for players seeking a full, step-by-step solution to another Colony Flow garden-grid challenge.
What order should I tap the active-row stacks in Colony Flow Level 57?
Tap pink 9 in cell 1, pink 9 in cell 2, white 11 in cell 3, then white 10 in cell 4, with one-beat spacing between each. Do not tap any source-row stack until all four active-row openers are moving. This clears the pink mass and white bridge before the blue 30 connector wave rises from source row 2.