














































































































































































Colony Flow Level 83 Walkthrough guides you through one of the game’s trickier puzzle stages, where managing resource flow and colony expansion requires precise timing and placement.
This level introduces narrower pathways and faster flow rates that punish inefficient builds, so understanding the optimal pipe layout and when to expand your colony nodes makes the difference between smooth completion and frustrating restarts. This walkthrough focuses on the core mechanics that matter most: the starting configuration that sets you up for success, which upgrades to prioritize as resources become available, and how to handle the mid-level bottleneck where most players get stuck.
You’ll get the specific colony placement pattern and flow control techniques that work reliably for this stage.
Colony Flow Level 83 Walkthrough
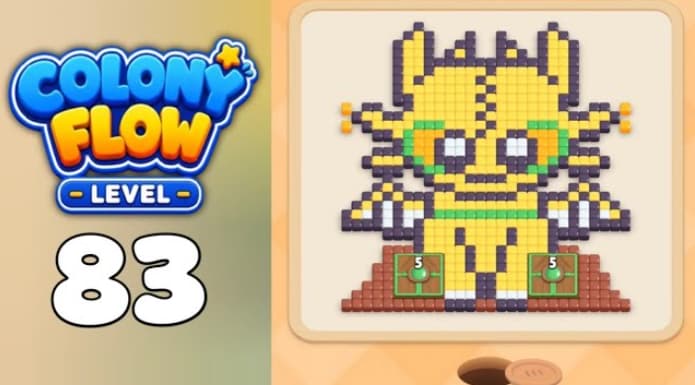
Colony Flow Level 83 features a Top Gamer cat board where yellow fur, black stripes, green torso, and green chest blocks all share one trail. The yellow 30 head opener must clear before the green 28 chest accent in source row 2 is touched.
Start with yellow 30 in active-row cell 1, then black 29 in cell 2. Wait for both waves to clear the dirt path beforeapping any source row stack. Clear source row 1 (three yellow 25s) next, then source row 2 (green 25, yellow 30, green 28), then source row 3 (two yellow 25s and yellow 10). Leave one beat between each wave to prevent jaming the shared path.
How to Play Colony Flow Level 83 - Full Solution
-
Tap yellow 30 in the first active-row cell. Yellow ants walk up to the head and start clearing the cells closest to the ant hole. Wait for the yellow wave to reach the bottom edge of the portrait before tapping the next stack.
-
Tap black 29 in the second active-row cell. Black ants trace the ear tufts and stripe accents. Leave one beat between yellow and black so the head clears before the accents start. Do not tap any source row stack yet.
-
Wait for both yellow and black waves to clear the dirt path between the ant hole and the bottom edge of the portrait.
-
Tap the three yellow 25 stacks in source row 1 as they rise into the active row—first cell, second cell, third cell. These clear the yellow body and arm highlights. Leave one beat between each wave. Do not tap source row 2 or 3 yet.
-
Tap green 25, yellow 30, and green 28 in source row 2 as they rise into the active row. Green clears the torso and the two chest blocks on the platform. Yellow clears the last highlight cells. Leave one beat between each wave.
-
Tap the two yellow 25s and yellow 10 in source row 3 as they rise. Yellow clears the last fur cells, and late refill waves finish the brown platform, white eyes, and remaining black accents. The portrait clears once the last cube routes off.
Colors: Yellow, Black, Green, Brown, White
Common Mistakes
-
Firing green 28 too early. If you tap the green 28 in source row 2, column 3 before the yellow 30 and black 29 opener waves have cleared the dirt path, green ants cross the yellow fur and stall on the chest blocks, blocking the green 25 that needs to clear the torso.
-
Tapping source row 1 too early. If you fire the three yellow 25s in source row 1 while black ants are still walking the dirt path, yellow ants strand on body cells and block the yellow 30 in source row 2.
-
Releasing yellow 10 before green 25 starts clearing the torso. The smallest yellow wave can strand on remaining fur cells.
Tips for Level 83
-
Tap the yellow 30 and black 29openers first. The yellow head and black ear tufts are the two highest-traffic regions and must clear together before you touch any source row stack.
-
Treat the active row as the opener queue. The three empty buffer pads in cells 3–5 let refills land as soon as the yellow 30 and black 29 drain. Tap source row 1 only after both opener waves have cleared, source row 2 only after row 1 has cleared, and source row 3 only after row 2 has cleared.
-
Save green 28 for after green 25 starts clearing the torso. The two chest blocks are the smallest green region. An early green 28 tap strands ants on the chest cells and blocks late green refills.
Related Games
- Colony Flow Level 30 Walkthrough — This is a useful follow-up for players practicing the same numbered-stack timing and color-routing decisions used to keep Level 83’s shared trail clear.
- Colony Flow Level 29 Walkthrough — Players who need more experience sequencing yellow and black ant waves can use this nearby Colony Flow puzzle guide to reinforce controlled tap order.
Board Layout
The board opens in portrait view. The top half shows a pixel-art yellow Top Gamer cat: yellow head with black ear tufts, large white eyes with black pupils, green torso with black stripes, short yellow arms, brown platform under the feet, and two small green chest blocks flanking the platform.
The working area is a 5-cell active row plus a 3-row, 3-column source grid. The active row opens as: yellow 30, black 29, empty white buffer pad, empty white buffer pad.
- Source row 1: yellow 25, yellow 25, yellow 25
- Source row 2: green 25, yellow 30, green 28
- Source row 3: yellow 25, yellow 10
Yellow cubes clear the head, arms, and body highlights. Black cubes clear the ear tufts, stripe accents, and mouth line. Green cubes clear the torso and chest blocks. Brown cubes clear the platform. White cubes clear the eyes and face highlights.