













































































































































































Colony Flow Level 125 Walkthrough breaks down the move order and lane priorities that make this puzzle solvable.
The key is recognizing that blue 17 and blue 27 form your true opening lane—they create the space yellow 57 and yellow 50 need to drain before the board fills up. Dark 7 and dark 2 should enter mid-game to prevent stranding the top cap and lower-right ring, while orange works best as follow-up traffic after your main blue and yellow routes are established.
Pale 1 and the tiny interior fillers are polish moves with minimal route-opening value.
Colony Flow Level 125 Walkthrough
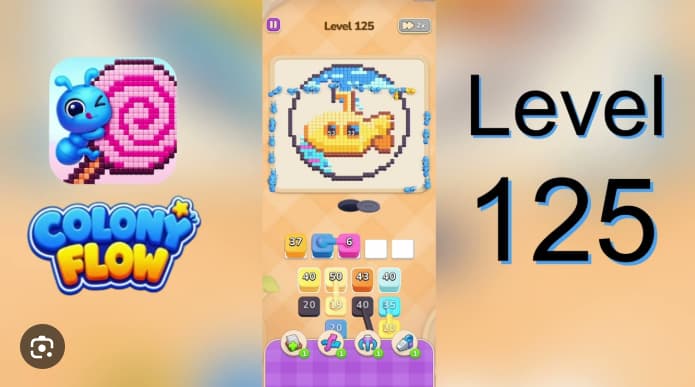
Colony Flow Level 125 is a yellow submarine board with a single shared ant hole. The key is managing traffic order: the blue left arcs and heavy yellow submarine body must move first, because the orange wedge, pale inner dots, and dark outer ring all depend on the same narrow lane.
Start with blue 17 and blue 27 to open the upper-left and lower-left curves. Follow immediately with yellow 57 and yellow 50 to drain the large center mass. Bring the dark ring into play during midgame—dark 7, dark 2, and the first larger dark stack carve the top notch and lower-right contour before the lane becomes crowded. Feed the orange wedge only after blue and yellow are underway. Hold pale 1 and other tiny interior dots for late cleanup, after the yellow submarine and dark ring have opened surrounding pockets.
Board Layout and Objectives
The board shows a pixel-art submarine inside a white circular frame. A dark charcoal ring forms the outer border, cyan-blue bands curve through the upper-left and lower-left sections, and an orange wedge sits on the right. Small pale dots and a dark top notch provide precision cleanup areas.
The active row loads with blue 17, pink 27, dark 7, pale 1, and blue 27. Early follow-up waves include yellow 57, yellow 50, blue 25, yellow 37, dark 2, then blue 3, yellow 25, yellow 5, black 20, dark 52, cyan 36, and pale cleanup singles.
The goal is to clear every section of the picture. Blue and cyan stacks handle the left-side and top arc bands, yellow drains the submarine body, orange clears the right wedge, dark finishes the outer border and lower-right contour, and pale singles clean tiny inner dots.
How to Play Colony Flow Level 125 - Step-by-Step Solution
Send blue 17, then blue 27
These clear the upper-left and lower-left curves, creating room for later cyan and blue cleaners and preparing the route for the yellow submarine.
Send yellow 57 and yellow 50
The yellow submarine is the board’s largest center mass. Move these heavy stacks through the lane early, while the route is open.
Open the dark ring during midgame
Use dark 7, dark 2, and the first larger dark follow-up to carve the top cap and lower-right contour. Waiting until endgame can leave the border sections with no clean finishing route.
Feed the orange wedge after blue and yellow are moving
Orange is a side accent. It uses the same narrow lane but does not create enough board space to move ahead of the main arcs and submarine body.
Hold pale 1 and tiny inner-dot stacks
These are precision cleanup pieces. Use them after the yellow center has shrunk and the dark ring has opened surrounding pockets. Sending them early parks ants in small spaces and interrupts the larger flow.
Finish the remaining curve, submarine, and border pieces
Clear cyan/blue curve cleaners first, then remaining yellow submarine strips, followed by the last dark outer-ring segments and pale inner dots. The board clears when the final left curve, lower-right dark ring, and last yellow submarine cells disappear together.
Common Mistakes
Sending pale 1 or tiny dot cleanup too early parks ants on small inner pockets and blocks the heavy ring finish. These stacks should wait until the blue arc and yellow submarine body are already open.
Ignoring the dark outer ring until too late leaves the top notch and lower-right contour with no clean clearing wave. Bring dark stacks in during midgame, not as an afterthought.
Treating the orange wedge as an opener wastes lane space while the circle’s main arc is still thick. Orange is a side accent, not setup traffic.
Tips for Completing Level 125
- Blue 17 and blue 27 are the true opening lane—they make space for nearly every later move
- Yellow 57 and yellow 50 need to drain while the board still has room for large stacks
- Dark 7 and dark 2 should enter before endgame to avoid stranding the top cap and lower-right ring
- Orange works best as a follow-up, after the main blue and yellow traffic is established
- Pale 1 and tiny interior fillers are polish—they provide little route-opening value
- If the lane feels crowded, return to larger exposed blue, yellow, or dark stacks to create space for smaller details
Related Games
- Colony Flow Level 57 Walkthrough — Level 125’s heavy yellow 57 submarine-body wave makes this a useful follow-up for players practicing large central-stack timing.
- Colony Flow Level 27 Walkthrough — The loaded blue 27 opener is central to clearing Level 125’s left-side arc before committing to the smaller cleanup stacks.
- Colony Flow Level 17 Walkthrough — Level 125 begins with blue 17 to establish the curved outer lane, linking this walkthrough to the board’s most important opening move.
Enjoy!