














































































































































































Colony Flow Level 140 Walkthrough guides you through one of the game’s trickiest puzzle stages, where the central face-and-hair design acts as a deliberate greed trap that punishes inefficient flow patterns.
This level demands precise colony placement and careful resource routing to avoid bottlenecks in the danger zone at the center. This walkthrough focuses on the most effective starting positions, optimal flow mechanics, and practical play strategies that help you clear Level 140 without wasting moves.
You’ll find actionable answers for managing the tricky center area, when to expand your colonies, and how to maintain clean flow paths from start to finish.
Colony Flow Level 140 Walkthrough
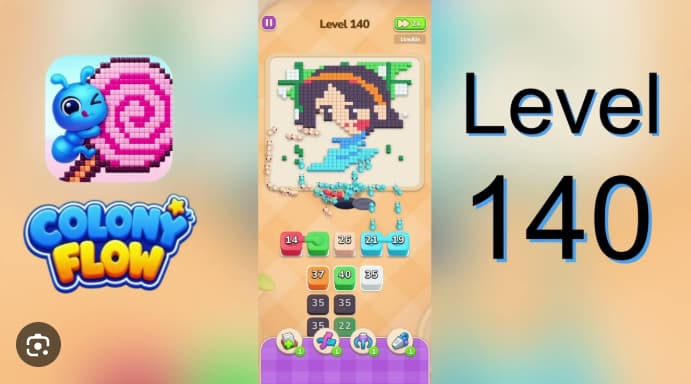
Colony Flow Level 140 is a framed girl-portrait board where the green outer border and pale background field control access to the single ant hole. The black hair, white face, and small red, blue, and orange accent details all funel through the same exit, so sequencing determines whether the board clears smoothly or clogs in the center.
The core rule: open the frame before the face.
The active row begins pre-loaded with cyan 20, cyan 13, green 1, dark 35, and green 11, then rotates through orange, dark, red, green, black, white, cyan, and late pale cleanup pieces.
The green border and pale field form the structural route. Black hair arcs around the top and right, white fills the face and neck, and small blue, red, and orange details mark the scarf, mouth, and hairband. All traffic shares one dark ant hole below the portrait.
How to Play Colony Flow Level 140 - Step-by-Step Walkthrough
-
Use the staged opener: play cyan 20, cyan 13, green 1, dark 35, and green 11. This drains the lower border and pale background without flooding the portrait center.
-
Keep feeding green and cyan until the outer frame is shrinking. Use cyan 45 / 40 and green stacks to maintain the structural lane. The border should control the route first.
-
Bring in the black hair once the frame is active. Play black 35 and later dark inserts only after the border has opened space. Hair sent early parks near the ant hole and blocks the exit.
-
Clear the white face pieces next. Use white 45 / 35 after the border and hair lanes have stabilized. The face drains more safely when it is not competing with the outer frame.
-
Save small details for cleanup. Hold the orange center waves, red 23, and blue 1 until midgame, then finish the remaining green edge fragments, black blocks, and pale dots.
Tips for Completing Colony Flow Level 140
- Treat green and cyan as priority traffic. They keep the frame route open, not minor cleanup.
- Do not rush the portrait center. Black hair and white face look efficient but block the shared exit before the border drains.
- Avoid the early detail trap. The blue scarf and red mouth are small targets that consume lane space without opening board access.
- Watch the frame, not just the matches. If the green border is still packed, return to green and cyan before adding more hair or face pieces.
Common Mistakes to Avoid
- Flooding the center with face or hair traffic before the green border is shrinking, which clogs the portrait and slows the outer collapse.
- Spending blue or red too early, wasting the lane on tiny scarf or mouth pockets while the larger silhouette still needs it.
- Treating the portrait interior as the opener instead of stabilizing the outer frame first.
Related Games
- Colony Flow Level 45 Walkthrough — Continue with another Colony Flow puzzle guide to apply the same careful ant-lane timing and color-order planning used to clear Level 140’s portrait board.
- Colony Flow Level 35 Walkthrough — This earlier walkthrough offers a useful follow-up for practicing structural clearing priorities before committing ants to crowded central color groups.
What Should I Tap First in Colony Flow Level 140?
Start with the border-and-field family already in the row: cyan 20, cyan 13, green 1, dark 35, and green 11. The outer frame controls the board’s pace. The black hair and white face should wait until the green border is already shrinking, and the blue scarf and red mouth are late-game cleanup after the main silhouette is reduced.