














































































































































































Colony Flow Level 47 Walkthrough guides you through one of the puzzle game’s trickiest stages, where you must connect matching colors across the grid without overlapping paths.
This level introduces tighter spacing and requires precise routing to achieve full solution—one wrong turn blocks the entire colony from completing. This walkthrough focuses on the clearest solve order and practical routing strategies that work.
You’ll find step-by-step path sequences, which pipes to lay first, and how to avoid the common dead-ends that force restarts.
Colony Flow Level 47 Walkthrough
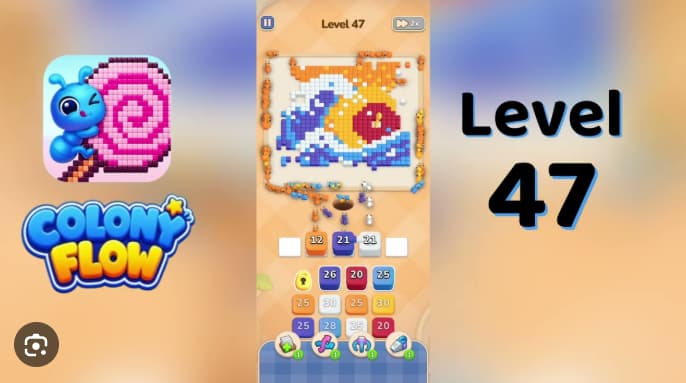
Level 47 presents a seahorse pixel-art scene where purple, blue, light-blue, white, yellow, orange, and red all share a single dirt trail. The challenge is managing traffic: small perimeter colors must clear the route before larger body and sun fills can move safely.
The board uses a five-cell active row with three white buffer pads reserved for late refills. Tapping stacks too quickly or filling those pads early blocks the delayed waves needed to finish the scene.
How to Play Colony Flow Level 47 - Full Solution
Start with the perimeter colors:
-
Tap purple 13 in active-row cell 1. Purple clears the small lower-left accent. Wait until the first purple ants pass the bottom edge of the seahorse before tapping another stack.
-
Tap blue 20 in active-row cell 2. Blue clears the lower-band wave cells. Leave a beat between purple and blue—they share the trail, and overlapping sends can block the route.
-
Tap light-blue 25 from source row 2, cell 1. Light-blue clears the sea-foam beneath the seahorse. Wait until the blue wave is at least half-cleared before releasing light-blue.
-
Wait for the lower trail to open. Let purple, blue, and light-blue ants clear the dirt path between the ant hole and the bottom edge of the seahorse before tapping any source-row stacks for white, yellow, orange, or red.
Continue with the body and sun fills:
-
Tap the following stacks in order as each rises into the active row:
- White 23 (source row 1, cell 1)
- Yellow 27 (source row 1, cell 2)
- Orange 25 (source row 1, cell 3)
- Red 25 (source row 1, cell 4)
- Orange 30 (source row 2, cell 2)
- Yellow 25 (source row 2, cell 3)
- Red 30 (source row 2, cell 4)
- Blue 25 (source row 3, cell 1)
- Yellow 25 (source row 3, cell 2)
- Red 20 (source row 3, cell 3)
Leave a beat between each tap. White handles highlights, yellow fills the seahorse body, orange clears crest foam, and red fills the sun. All use the same trail, so wait for the current wave to clear crowded lower cells before starting the next.
Finish with late refills:
- Tap the late refill waves as they rise into active-row cells 3, 4, and 5 (the white buffer pads). The order will be yellow, white, red, blue, orange, light-blue, then purple. These clear remaining accent, foam, highlight, wave, body, and sun cells. The board clears once the final purple refill reaches the lower-left accent.
Common Mistakes
-
Tapping yellow 27, orange 25, or red 25 from source row 1 before purple, blue, and light-blue have cleared the perimeter. This sends yellow, orange, or red ants across wave or foam cells that blue or light-blue still need to clear, blocking the route and stranding later refills.
-
Releasing orange 30 from source row 2 while blue or light-blue ants are still on the trail. Orange ants stop on unfinished foam cells and block the orange 25 from source row 1 plus late orange refills.
-
Filling active-row buffer pads (cells 3, 4, or 5) with early stacks. This prevents late refill waves from rising into those slots, leaving small accent, foam, or highlight cells empty at the end.
Quick Tips
-
Clear purple, blue, and light-blue before tapping white, yellow, orange, or red. The perimeter colors open the trail for the larger groups.
-
Protect the three buffer pads. Active-row cells 3, 4, and 5 are reserved for late refills. Do not tap a buffer pad unless the stack is a delayed wave.
-
Watch the ants, not just stack availability. Start the next wave only when the prior one has moved beyond the congested lower cells.
-
Use spacing as the main traffic rule. Leave a beat between taps, especially when colors share the lower dirt trail.
Related Games
- Colony Flow Level 30 Walkthrough — Continue practicing the color-stack timing and shared-path routing used in Level 47 with another mid-game Colony Flow puzzle.
- Colony Flow Level 27 Walkthrough — This nearby-level guide offers another useful reference for sequencing ant waves without clogging the active-row buffer spaces.
- Colony Flow Level 25 Walkthrough — Use this walkthrough for additional practice reading source-row refills and spacing taps between matching-color routes.
Board Layout and Route Strategy
The seahorse scene includes blue waves along the lower edge, light-blue foam under the body, a yellow seahorse, white highlights, orange crest foam, a red sun, and a small purple accent in the lower-left. All targets feed through one dirt trail.
The five-slot active row has three white buffer pads in cells 3, 4, and 5. These are holding spaces for late refills, not spare moves. Filling them with early stacks strands the delayed waves needed to finish the board.
Approach by layers: purple accent, blue waves, and light-blue foam open the route, while yellow body, orange details, white highlights, and red sun are larger interior fills. Releasing the groups first creates traffic where outer colors still need to travel.